Outlook 2013 - Send/ Receive Groups
Send/Receive groups in Microsoft Outlook contain one or more email accounts that you have set up in Microsoft Outlook. By default, the All Accounts Send/Receive group is preconfigured and included with Microsoft Outlook 2013 and Outlook 2016.
If you have only one account, the default All Accounts group is all that you need. You can change this group for the settings that you want to affect your single account. However, if you have any combination of multiple email accounts, we recommend that you leave the All Accounts group as is and create custom groups to customize the connection and download actions.
Change send/receive group settings
You worked offline for a while, then logged on and pressed F9 to send and receive your messages. A moment later, you realized you'd sent a message from your personal account instead of your work account. You quickly recall the message, and (whew!) the recall succeeds, but you'd rather not do that again.
No problem. You can change your send/receive group settings so you only send messages from specific email accounts.
-
Click Send/Receive > Send/Receive Groups > Define Send/Receive Groups.
-
Click the group you want to change.
-
Change the options.

For example:
-
If you only want to send and receive mail when you press F9, clear the first Schedule an automatic send/receive every n minutes option.
-
If you frequently work offline, and you check the second Schedule an automatic send/receive every n minutes option, Outlook tries to connect and send and receive your messages at the interval you specify.
-
If you uncheck the option above that, Outlook won't send mail from that account when it runs that periodic send/receive operation.
Changing the All Accounts group
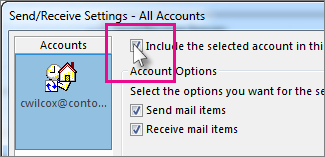
The All Accounts group shown in the picture above is an umbrella group that includes all your email accounts. If you want to stop send/receive for one or more of your email accounts, you can remove those accounts from the All Accounts group.
-
Click All Accounts.
-
Click Edit.
-
Click the account you want to remove and uncheck the Include the selected account in the group option.

-
Click OK.
Tip You can create your own send/receive groups and give them the settings you prefer. To do that, see Why use Send/Receive groups?
Related Articles
Outlook 2016, 2013 - Change existing POP and IMAP account settings
Change POP or IMAP account settings For all POP and IMAP accounts, you can change a variety of different settings, including your name, server settings, your default reply-to email address, and sent item settings. In Outlook, choose File > Account ...Automatic Reply Setup in Outlook for Office 365
Here are the instructions for how to set up an Automatic Reply, or out -of-office message, for your Office 365 email address: 1. Using a web browser (MS Edge, Firefox, Chrome) log in to the Outlook Web Application at https://outlook.office.com 2. In ...Outlook 2010 - change existing POP or IMAP account settings
Change your e-mail account password If you want to change the password that is used to access your mail server, follow the instructions that are provided by your ISP or e-mail administrator. After your password for the mail server changes, then ...Setup Exchange Online account - in Outlook 2016 for PC
Use Outlook automatic account setup for your email In many cases, Outlook can set up your account for you with only an email address and a password. Open Outlook 2016 on your PC In Outlook, choose the File tab. Under Account Information, choose Add ...WebWorkz Email for Outlook 2011 on MAC
Here are instructions on setting up a ConnectMail hosted email account on Outlook for Mac: 1. First thing you'll want to do is open up Outlook and from the Outlook drop-down menu, select Preferences. 2. On the Preferences menu, you'll select Accounts ...